Pizza Picnic
Once you've got the hang of that Roberta's Pizza Dough recipe, it can free you up to do all kinds of things. In fact, your confidence might be such that you find yourself visiting your local restaurant supply store to pick up pizza boxes. I mean, don't those beautiful almost-pro pies of yours deserve it?
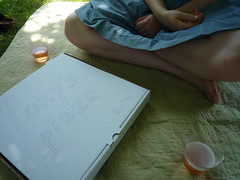 fig. a: Tony's Pizza: We deliver!
The Roberta's Pizza Dough recipe is intended to make classic, round Neapolitan pies that are cooked fast in a blistering-hot oven. But it can just as easily be used to make the kind of pan pizzas that places like Jim Lahey's Sullivan Street Bakery specialize in. In fact, combining the Roberta's method with aspects of Lahey's method results in some truly outstanding pan pizzas. And there are a number of advantages to this approach for the novice:
1. you don't need a pizza stone
2. you don't need a pizza peel
3. these pizzas can be easier to form
4. these pizzas tend to have better staying power
"Staying power"? Yeah, your classic Neapolitan pizza is best eaten fresh out of the oven. That doesn't mean it won't be tasty later, either at room temperature, or cold out of the refrigerator, but it's at its absolute peak piping-hot, just moments after having been pulled out of that blistering-hot oven.
Your pan pizza, on the other hand, is often just as good when it's at room temperature--especially if you make the kinds of simple, but smart and delicious pizzas Sullivan Street Bakery became famous for.
This, in turn, opens up further possibilities--like pizza picnics! Get your hands on those pizza boxes and you suddenly have a dish that's (fairly) easily transportable, that's ready to eat and keeps nicely, and that's a real crowd-pleaser.
In fact, all you need is a bottle of rosé, some olives, and a nice salad, and you've got yourself a complete picnic spread.
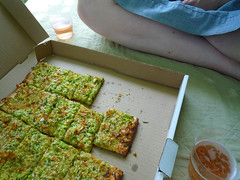
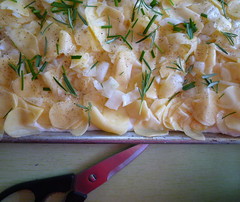
 figs. b & c: Tony's zuke pie
Then all you have to do is round up some of your pizza-loving friends. You might even want to dust off your old croquet set as an added lure. If you've got a backyard with a suitable lawn, and you're a real Eighties Revivalist, you can go for that Heathers look.
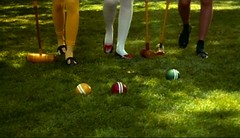 fig. d: girls gone wild
Then again, if you're more into that Downton Abbey vibe, choose the lushest, most perfectly manicured park you can find. Preferably one that lies in front of an actual castle.
And if you want to really challenge your guests, select a park that's got some lush and shady sections, for dining and spectating, surrounding a chewed-up ole dogpatch, like we did. That's when you discover who the true "magicians of the mallet" are. Already, by our second match, a number of members of our crew were running off brilliant runs of shots, in spite of the difficult terrain.
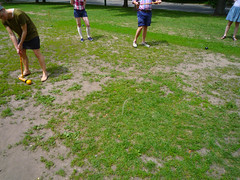 fig. e: diamonds in the rough
Anyway, I was so excited by the prospect of a pizza picnic that I baked three different kinds the morning of our Pall Mall Pizza Picnic. The pizza you see above is our latest coup de coeur: an unorthodox, but fantastically tasty zucchini and Gruyère pie (the Italian original would be made with Fontina instead). The photos you see below are a couple of before & after shots of the pan pizza that's been a go-to dish for us for the last few months: pizza patate or potato pie.
 figs. f & g: potato pizza, before & after
Okay, so what exactly is the Lahey Pan Pizza Method? Well, it looks like this.
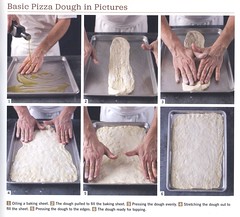 fig. h: Jim Lahey demonstrates
It starts with your pizza dough. You can use Lahey's own recipe from My Bread, or you can use that Roberta's Pizza Dough Recipe--just make sure to use the full "24-hour" version, featuring 18 to 24 hours of slow fermentation time, if you opt for Roberta's Pizza Dough.
Then you need a 13" x 18" sheet pan and some olive oil.
And, finally, you need to carefully stretch the dough across the sheet pan, forming a rectangular shape. Check out Lahey's technique in the image above.
With just these elements, you're ready to make a minimalist flatbread. Just drizzle a little olive oil on top, sprinkle it with sea salt, and bake in a pre-heated 500º F oven.
But these element also form the basics for Lahey's topped pies.
Potato Pizza
1 qt lukewarm water
4 tsp kosher salt
6 to 8 medium Yukon Gold potatoes, peeled
1 cup yellow onion, diced
freshly ground black pepper
1/3 cup extra-virgin olive oil
Pizza Dough (use 1/2 of Lahey's Basic Pizza Dough recipe from My Bread, or 1/2 of Roberta's Pizza Dough recipe)
fresh rosemary
and/or
fresh chives, chopped
special equipment: a mandoline, to make the extra-thin potato slices you need for such a pie
In a medium bowl, combine the water and the salt, stirring until the salt is dissolved. Use a mandoline to slice the potatoes very thin (1/16th of an inch thick), and put the slices directly into the salted water. Let soak in the brine for 1 1/2 hours (or refrigerate and soak for up to 12 hours), until the slices are wilted and no longer crisp. Doing so will prevent against your potatoes oxidizing, but, more importantly, it will both salt your potatoes and help leach out the water in the potato slices themselves. This is an essential step, so don't try to cheat on it.
When your potato slices are ready, reheat your oven to 500º F, with a rack placed in the center.
Drain the potatoes in a colander and use your hands to press out as much excess water as possible, then pat dry, using a clean dishtowel or some paper towel. In a medium bowl, toss together the potato slices, onion, pepper, and olive oil.
Stretch your pizza dough over an oiled 13" x 18" baking sheet as shown in the demo above.
Spread the potato mixture evenly over the dough, going all the way to the edges of the pan. Make sure to put a bit more of the topping around the edges of the pie, as the outside tends to cook more quickly. Sprinkle evenly with the rosemary and/or the chives.
Bake for 20-25 minutes and check on your pizza. The topping should be golden brown and the crust should be pulling away from the sides of the baking sheet. Serve the pizza hot or at room temperature.
Lahey recommends cutting the pizza into 8 generous slices. For a picnic, you may want to cut the pizza up into smaller slices.
Zucchini Pizza
3 large zucchini, or 6 to 8 medium zucchinis (about 2.5 pounds)
1 1/2 tsp kosher salt
2 cups grated Gruyère
Pizza Dough (use 1/2 of Lahey's Basic Pizza Dough recipe from My Bread, or 1/2 of Roberta's Pizza Dough recipe)
2 to 2 1/2 tbsp homemade bread crumbs
Use a box grater to grate the zucchini. In a medium-sized bowl, toss together the zucchini and salt. Let stand for 15-20 minutes, until the zucchini has wilted and released its water.
Meanwhile, preheat your oven to 500º F, with a rack in the center position.
Drain the zucchini in a colander, use your hands to squeeze out as much water as possible, then pat dry, using a clean dishtowel or some paper towel. Salting the zucchini, letting it release its water, draining it, and patting it dry is absolutely essential to the success of this pizza. Skipping any of these steps will result in a disastrously soggy pizza, so, please, no cheating.
In a medium bowl, toss together the zucchini and cheese, breaking up any clumps of zucchini, until well mixed.
Stretch your pizza dough over an oiled 13" x 18" baking sheet as shown in the demo above.
Spread the zucchini mixture over the dough. Make sure to put a bit more of the topping around the edges of the pie, as the outside tends to cook more quickly. Sprinkle the top evenly with bread crumbs. These give the pizza both color and texture.
Bake for 20-25 minutes and check on your pizza. The topping should be golden brown and the crust should be pulling away from the sides of the baking sheet. Serve the pizza hot or at room temperature.
Again, Lahey recommends cutting the pizza into 8 generous slices. For a picnic, you may want to cut the pizza up into smaller slices.
[both recipes are closely based on recipes that appear in Jim Lahey's My Bread]


2 comments:
I'm so bummed I couldn't be there. That pizza is making my hungover tummy growl (loudly). Gonna get on this recipe - Roberta's pizza made me believe in God the last time I was in NY....
There will be others, Heather! (We'll be in touch.)
Post a Comment